如何创建SpringBoot工程
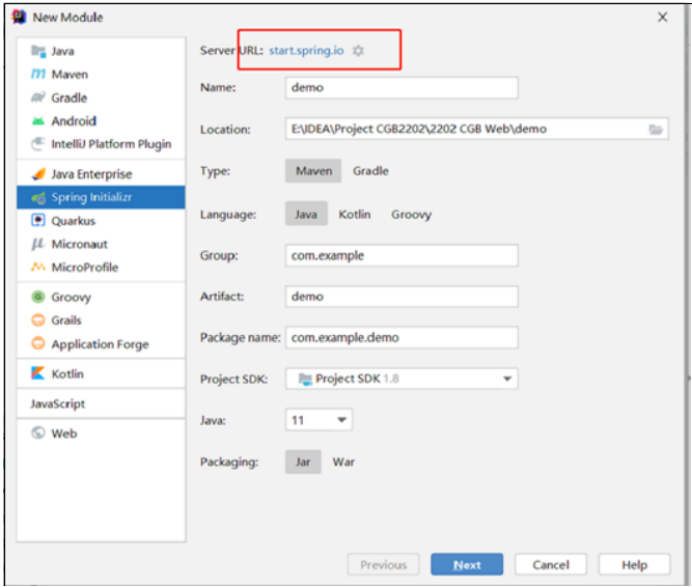
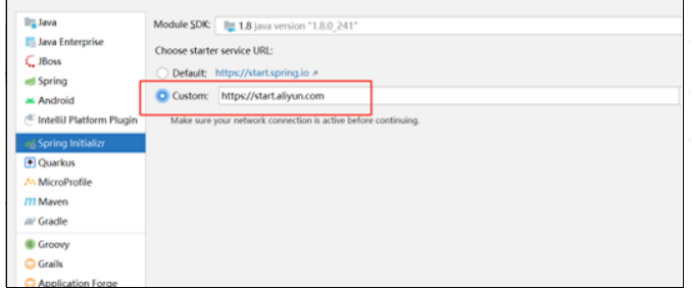
- 第一个页面中可以修改创建工程的网址
a. https://start.spring.io 默认
b. https://start.springboot.io 备用1
c. https://start.aliyun.com 备用2


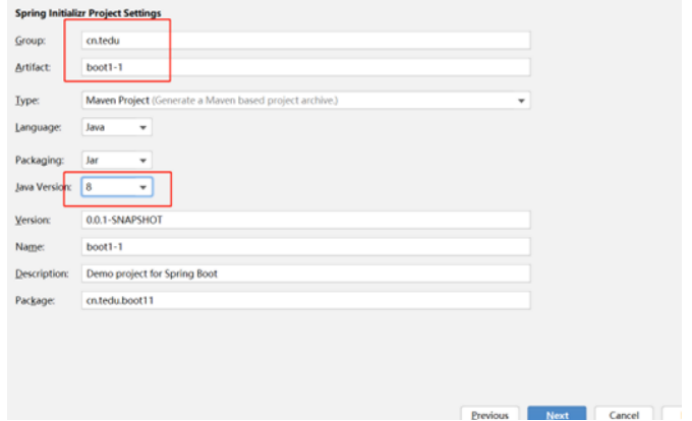
- 设置以下内容

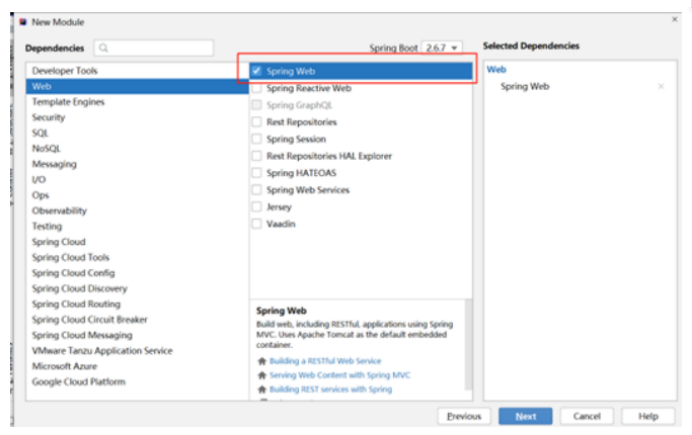
- 选择创建工程时添加的依赖

-
点击Finishi等待下载内容

-
如何检查工程是否创建成功?
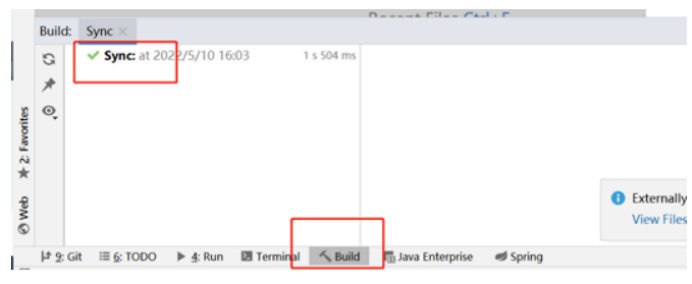
在idea的底部 找到Build 然后看里面是否出现绿色的对勾

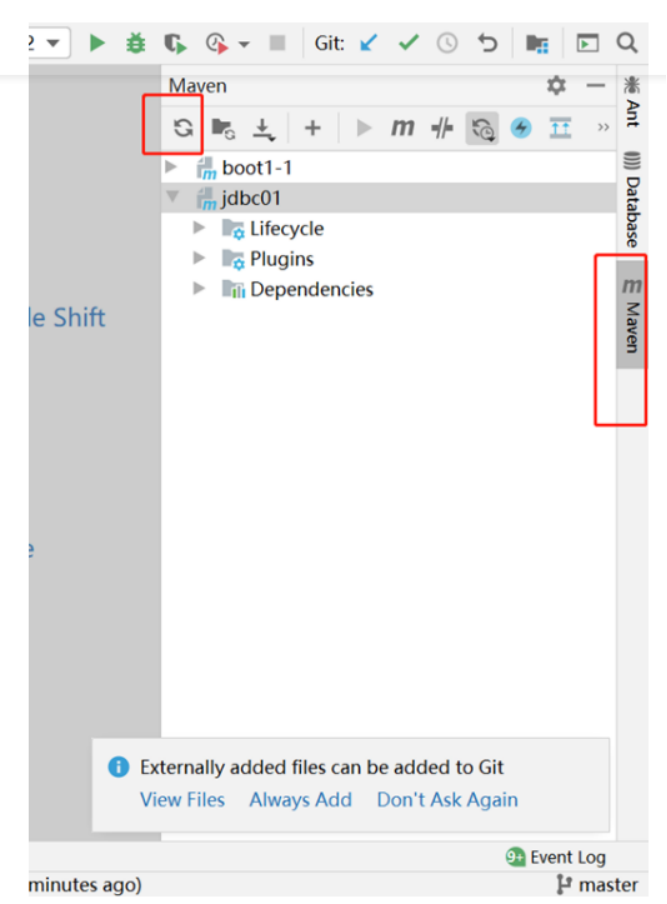
- 如果第五步没有绿色对勾 , 刷新maven

-
检查maven是否已经改成aliyun的配置文件(settings文件)
-
如果已经改成aliyun的 , 还有错的话 , 找到 .m2 文件夹下的repository文件夹删除 , 删除完之后再次重复第6步刷新maven
-
在工程的static文件夹中添加index.html , body中添加h1标签 , 页面中显示HelloSpringBoot , 启动工程通过浏览器访问http://localhost:8080 检查是否显示此页面
-
创建controller.HelloController类 , 在里面添加hello方法处理/hello请求 , 给客户端响应一句话 , 重启工程 , 浏览器访问http://localhost:8080/hello 测试是否成功
1
2
3
4
5
6
7
8
9
10
11
12
13
14
15
16
17
18
19
| package cn.tedu.boot11.controller;
@Controller
public class HelloController {
@RequestMapping("hello")
public void hello(HttpServletResponse response) throws IOException {
response.setContentType("text/html;charset=utf-8");
PrintWriter pw = response.getWriter();
pw.print("服务器接收到了请求!<h1>测试成功!</h1>");
pw.close();
}
}
|

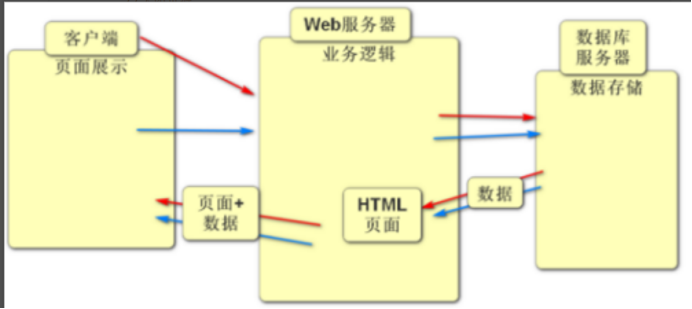
Web服务软件做了那些事儿?
- web服务软件就是之前写的webServer, 也就是Tomcat
-
负责建立底层的网络连接
-
根据客户端请求的静态资源路径找到对应的静态资源文件并把该文件返回给客户端
举例:http://localhost:8080/index.html
-
根据客户端请求的动态资源路径找到对应的Controller里面的方法并且执行
举例:http://localhost:8080/hello
- Web服务软件自身不提供任何业务功能 , 通过Controller给工程添加具体的业务功能
SSM三大框架
-
Spring框架(第四阶段讲)
-
SpringMVC框架(第二阶段到第四阶段)
-
Mybatis框架(第三阶段到第四阶段)
SpringBoot框架
- 如果创建一个空工程 , 在此工程中使用SSM框架时需要添加大量的依赖和书写大量的配置文件 , 通过SpringBoot框架可以更加便捷的让工程中引入各种框架, SpringBoot框架帮助我们构建工程.
客户端发出请求的几种方式
-
通过浏览器的地址栏中发出请求
-
通过html页面中的超链接发出请求
-
通过html页面中的form表单发出请求
-
通过前端框架发出请求
创建新项目boot2-1
- static目录下创建index.html , 添加 h1标签工程首页 , 并测试
- boot21.controller中创建HelloController
HelloController
1
2
3
4
5
6
7
8
9
10
11
12
13
14
15
16
17
18
19
20
21
22
| package cn.tedu.boot21.controller;
@Controller
public class HelloController {
@RequestMapping("hello")
@ResponseBody
public String hello() {
return "测试成功!222";
}
}
|
index.html
1
2
3
4
5
6
7
8
9
10
11
12
13
14
15
16
17
18
| <!DOCTYPE html>
<html lang="en">
<head>
<meta charset="UTF-8">
<title>Title</title>
</head>
<body>
<h1>工程首页</h1>
<h2>通过超链接发出请求</h2>
<a href="hello">相对路径</a>
<a href="/hello">绝对路径1</a>
<a href="http://localhost:8080/hello">绝对路径2</a>
</body>
</html>
|
HelloController
1
2
3
4
5
6
7
8
9
10
11
12
13
14
15
16
17
18
19
20
21
22
23
24
25
26
27
28
29
30
31
32
33
34
35
36
37
38
39
40
41
42
43
| package cn.tedu.boot21.controller;
@Controller
public class HelloController {
@RequestMapping("hello")
@ResponseBody
public String hello() {
return "测试成功!222";
}
@RequestMapping("param1")
@ResponseBody
public String param1(HttpServletRequest request) {
String info = request.getParameter("info");
return "接收到了参数:"+info;
}
@RequestMapping("param2")
@ResponseBody
public String param2(String name,int age) {
return "接收到了参数:"+name+"年龄:"+age;
}
@RequestMapping("param3")
@ResponseBody
public String param3(Emp emp) {
return emp.toString();
}
}
|
index.html
1
2
3
4
5
6
7
8
9
10
11
12
13
14
15
16
17
18
19
20
21
22
23
24
25
26
27
28
29
30
31
32
33
34
35
36
37
38
39
40
| <!DOCTYPE html>
<html lang="en">
<head>
<meta charset="UTF-8">
<title>Title</title>
</head>
<body>
<h1>工程首页</h1>
<h2>通过超链接发出请求</h2>
<a href="hello">相对路径</a>
<a href="/hello">绝对路径1</a>
<a href="http://localhost:8080/hello">绝对路径2</a>
<h2>通过form表单发出请求</h2>
<form action="/param1">
<input type="text" name="info">
<input type="submit">
</form>
<h2>第二种传参方式</h2>
<form action="/param2">
<input type="text" name="name">
<input type="text" name="age">
<input type="submit">
</form>
<h2>第三种传参方式</h2>
<form action="/param3">
<input type="text" name="name">
<input type="text" name="sal">
<input type="text" name="job">
<input type="submit">
</form>
</body>
</html>
|
创建实体类Emp
1
2
3
4
5
6
7
8
9
10
11
12
13
14
15
16
17
18
19
20
21
22
23
24
25
26
27
28
29
30
31
32
33
34
35
36
37
38
39
40
41
| package cn.tedu.boot21.entity;
public class Emp {
private String name;
private double sal;
private String job;
public String getName() {
return name;
}
public void setName(String name) {
this.name = name;
}
public double getSal() {
return sal;
}
public void setSal(double sal) {
this.sal = sal;
}
public String getJob() {
return job;
}
public void setJob(String job) {
this.job = job;
}
@Override
public String toString() {
return "Emp{" +
"name='" + name + '\'' +
", sal=" + sal +
", job='" + job + '\'' +
'}';
}
}
|
static目录下创建reg.html
1
2
3
4
5
6
7
8
9
10
11
12
13
14
15
16
| <!DOCTYPE html>
<html lang="en">
<head>
<meta charset="UTF-8">
<title>Title</title>
</head>
<body>
<h1>注册页面</h1>
<form action="/reg">
<input type="text" name="username" placeholder="用户名">
<input type="text" name="password" placeholder="密码">
<input type="text" name="nickname" placeholder="昵称">
<input type="submit" value="注册">
</form>
</body>
</html>
|
UserController
1
2
3
4
5
6
7
8
9
10
11
| package cn.tedu.boot21.controller;
@Controller
public class UserController {
@RequestMapping("reg")
@ResponseBody
public String reg(User user) {
return user.toString();
}
}
|
创建实体类User
1
2
3
4
5
6
7
8
9
10
11
12
13
14
15
16
17
18
19
20
21
22
23
24
25
26
27
28
29
30
31
32
33
34
35
36
37
38
39
40
41
42
43
44
45
46
47
48
49
50
51
| package cn.tedu.boot21.entity;
public class User {
private Integer id;
private String username;
private String password;
private String nickname;
public Integer getId() {
return id;
}
public void setId(Integer id) {
this.id = id;
}
public String getUsername() {
return username;
}
public void setUsername(String username) {
this.username = username;
}
public String getPassword() {
return password;
}
public void setPassword(String password) {
this.password = password;
}
public String getNickname() {
return nickname;
}
public void setNickname(String nickname) {
this.nickname = nickname;
}
@Override
public String toString() {
return "User{" +
"id=" + id +
", username='" + username + '\'' +
", password='" + password + '\'' +
", nickname='" + nickname + '\'' +
'}';
}
}
|
工程中使用数据库需要做的几件事:
-
在pom.xml中添加 MySQL依赖和数据库连接池依赖 , 从jdbc01工程中去复制两个依赖粘贴到新工程中, 然后刷新maven(必须做)
-
把jdbc01工程中的DBUtils 复制到新工程的utils包(在boot21下新建此包)下面
UserController
1
2
3
4
5
6
7
8
9
10
11
12
13
14
15
16
17
18
19
20
21
22
23
24
25
26
27
28
29
30
31
32
33
34
35
36
37
38
39
40
41
42
43
44
45
46
47
48
49
50
51
52
53
54
55
| package cn.tedu.boot21.controller;
@Controller
public class UserController {
@RequestMapping("reg")
@ResponseBody
public String reg(User user) {
try(Connection conn = DBUtils.getConn()) {
String sql = "select id from user where username = ?";
PreparedStatement ps = conn.prepareStatement(sql);
ps.setString(1,user.getUsername());
ResultSet rs = ps.executeQuery();
if (rs.next()) {
return "用户名已存在!";
}
String insertSql = "insert into user values(null,?,?,?)";
PreparedStatement insertPs = conn.prepareStatement(insertSql);
insertPs.setString(1,user.getUsername());
insertPs.setString(2,user.getPassword());
insertPs.setString(3,user.getNickname());
insertPs.executeUpdate();
} catch (SQLException e) {
e.printStackTrace();
}
return "注册成功!";
}
@RequestMapping("login")
@ResponseBody
public String login(User user) {
try(Connection conn = DBUtils.getConn()) {
String sql = "select password from user where username = ?";
PreparedStatement ps = conn.prepareStatement(sql);
ps.setString(1,user.getUsername());
ResultSet rs = ps.executeQuery();
if (rs.next()) {
if (rs.getString(1).equals(user.getPassword())) {
return "登录成功!";
}
return "密码错误";
}
} catch (SQLException e) {
e.printStackTrace();
}
return "用户名不存在";
}
}
|
login.html
1
2
3
4
5
6
7
8
9
10
11
12
13
14
15
| <!DOCTYPE html>
<html lang="en">
<head>
<meta charset="UTF-8">
<title>Title</title>
</head>
<body>
<h1>登录页面</h1>
<form action="/login">
<input type="text" name="username" placeholder="用户名">
<input type="password" name="password" placeholder="密码">
<input type="submit" value="登录">
</form>
</body>
</html>
|

